
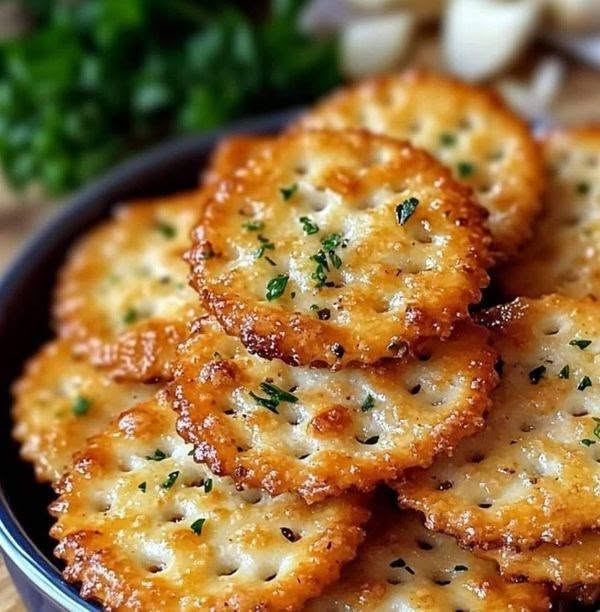
Crispy Cheesy Parmesan Crackers Recipe: Easy, Buttery, and Delicious
Homemade cheese crackers are a wonderful snack when you want something crunchy, savory, and full of cheesy flavor. These crispy Parmesan crackers are inspired by the golden, beautifully browned crackers in your picture. They have buttery edges, a rich cheese flavor, and a satisfying crunch that makes them perfect for tea time, parties, movie nights, or afternoon snacks.
The recipe uses simple ingredients such as cheddar cheese, Parmesan, butter, flour, and a few seasonings. You do not need special equipment or professional baking skills to make them. With the right dough consistency and baking temperature, you can create delicious homemade crackers that look and taste like something from a bakery.
This step-by-step guide explains how to prepare the dough, shape the crackers, bake them until golden, and store them so they stay crisp.
Recipe Overview
-
Preparation time: 20 minutes
-
Chilling time: 30 minutes
-
Baking time: 12–16 minutes per batch
-
Total time: Approximately 1 hour 10 minutes
-
Yield: 35–45 small crackers
-
Difficulty: Easy
-
Oven temperature: 180°C (350°F)
Ingredients
For the best flavor, use freshly grated cheese and cold butter.
-
1 cup (100 g) finely grated sharp cheddar cheese
-
½ cup (45–50 g) finely grated Parmesan cheese
-
1 cup (125 g) all-purpose flour
-
4 tablespoons (55 g) cold unsalted butter, cut into small cubes
-
2–3 tablespoons cold water, as needed
-
¼ teaspoon salt, adjusted to the saltiness of the cheese
-
½ teaspoon garlic powder
-
¼ teaspoon paprika
-
¼ teaspoon freshly ground black pepper
-
1 teaspoon dried parsley, optional
-
1 tablespoon finely chopped fresh parsley, optional for garnish
Optional additions: A pinch of chili flakes for heat, a little onion powder for extra savory flavor, or a small amount of sesame seeds for a nutty finish.
Step 1: Prepare the Cheese
Start by grating the cheddar and Parmesan cheeses into a bowl.
Finely grated cheese is easier to mix into the dough and distributes more evenly throughout the crackers. Sharp cheddar provides a strong, familiar cheese flavor, while Parmesan adds a salty, nutty taste that complements the butter.
Freshly grated cheese is generally preferable to pre-shredded cheese because packaged shredded varieties often contain anti-caking ingredients that can affect how smoothly the dough comes together.
Set the grated cheese aside while you prepare the dry ingredients.
Step 2: Mix the Dry Ingredients
In a large mixing bowl, combine the all-purpose flour, garlic powder, paprika, black pepper, and dried parsley if using.
Add the salt carefully. Parmesan and cheddar already contain salt, so you may need very little extra.
Whisk everything together for about 20 seconds to distribute the seasonings evenly.
The mixture should have a uniform appearance, with no large clumps of seasoning. This helps every cracker develop the same savory flavor.
Step 3: Add the Cold Butter
Add the cold butter cubes to the flour mixture.
Using your fingertips, a pastry cutter, or two forks, work the butter into the flour until the mixture resembles coarse crumbs.
Avoid melting the butter before adding it. Cold butter helps produce a tender, crisp texture and makes the dough easier to handle.
Continue mixing until most of the butter pieces are small and evenly distributed. A few tiny pieces are perfectly fine.
If the butter begins to soften significantly, place the bowl in the refrigerator for several minutes before continuing.
Step 4: Add the Cheese
Add the grated cheddar and Parmesan to the butter-flour mixture.
Mix gently with a fork or your fingertips until the cheese is evenly distributed.
The mixture may still appear crumbly at this stage. That is normal because the cheese and butter have not yet formed a cohesive dough.
Avoid adding too much liquid immediately. The cheese and butter contribute moisture and fat, so the dough may need only a small amount of water to hold together.
Step 5: Bring the Dough Together
Add 1 tablespoon of cold water and gently mix the ingredients.
If the dough remains too crumbly to hold together when pressed, add another tablespoon of water. Add the final tablespoon only if necessary.
Gather the mixture into a ball using your hands. Press it together gently rather than kneading it vigorously.
The finished dough should be firm, smooth enough to roll, and slightly crumbly without falling apart.
If the dough feels sticky, add a little flour. If it feels dry and breaks apart immediately, add a few drops of water.
Good dough consistency is essential for crackers that hold their shape and bake evenly.
Step 6: Chill the Dough
Shape the dough into a flat disc and wrap it in food-safe plastic wrap or place it in a covered container.
Refrigerate for approximately 30 minutes.
Chilling firms the butter and makes the dough easier to roll. It also helps prevent the crackers from spreading excessively in the oven.
Do not skip this step if your kitchen is warm or the dough feels soft.
While the dough chills, preheat your oven to 180°C (350°F) and line a baking tray with parchment paper.
Step 7: Roll Out the Dough
Remove the chilled dough from the refrigerator and place it on a lightly floured work surface.
Roll it out evenly to a thickness of approximately 2–3 millimeters. Thinner crackers generally become crispier, while slightly thicker crackers have a more substantial bite.
Rotate the dough occasionally as you roll to prevent sticking.
If the dough cracks along the edges, gently press the cracks together with your fingers. If it becomes too soft, return it to the refrigerator for another 5–10 minutes.
Try to maintain an even thickness throughout the sheet so all the crackers finish baking at approximately the same time.
Step 8: Cut and Shape the Crackers
Use a small round cookie cutter to make circular crackers similar to those in your picture.
Alternatively, cut the dough into squares, rectangles, or small diamond shapes with a sharp knife.
Transfer the shapes carefully to the prepared baking tray, leaving a little space between each cracker.
Gather the leftover dough, press it together gently, and roll it out again. Cut additional crackers until most of the dough has been used.
Avoid repeatedly working the dough too much, as excessive handling can make the crackers less delicate.
For a decorative finish, press a few tiny holes into each cracker using a fork. These holes help release steam and reduce puffing during baking.
Step 9: Add the Final Seasoning
For extra flavor, sprinkle a tiny amount of black pepper or paprika over the crackers before baking.
You can also add a small pinch of finely grated Parmesan to each cracker.
Do not add too much extra cheese on top, because cheese that melts beyond the edges may brown quickly.
If you want a more herbaceous flavor, reserve the fresh parsley for after baking. Fresh herbs can lose their color and flavor when exposed to prolonged oven heat.
Step 10: Bake Until Golden
Place the baking tray on the middle rack of your preheated oven.
Bake for approximately 12–16 minutes, checking the crackers toward the end of the cooking time.
They are ready when the edges are golden brown and the centers look set. Smaller or thinner crackers may finish earlier, so remove them individually if needed.
If the crackers remain pale, bake them for another minute or two while watching carefully. Cheese can go from golden to burnt relatively quickly.
For even browning, rotate the tray halfway through baking if your oven has hot spots.
Remember that the crackers may still feel slightly soft when they first come out of the oven. They will become firmer and crispier as they cool.
Step 11: Cool the Crackers Properly
Remove the tray from the oven and let the crackers rest for approximately 5 minutes.
Transfer them to a wire rack to cool completely.
Cooling is an important part of the recipe because moisture escapes as the crackers cool, allowing their texture to become crisp.
Sprinkle with a little fresh parsley if desired.
Do not immediately place warm crackers into a sealed container. Trapped steam can make them soft and reduce their shelf life.
Step 12: Serve and Enjoy
Arrange the cooled crackers on a serving plate or in a small bowl.
They are delicious on their own, but you can also serve them with creamy dips, hummus, tomato salsa, cream cheese, or a mild garlic dip.
For a party platter, combine them with olives, fresh vegetables, cheese cubes, and sliced fruit.
You can also crumble the crackers over creamy soups or salads for a crunchy, cheesy topping.
Their buttery flavor and crisp texture make them a satisfying snack for adults and children alike.
Tips for Perfect Crispy Cheese Crackers
-
Use finely grated cheese: This helps the ingredients combine evenly.
-
Keep the butter cold: Cold butter makes the dough easier to handle.
-
Roll evenly: Consistent thickness helps prevent some crackers from burning while others remain soft.
-
Chill before baking: This helps the crackers retain their shape.
-
Make fork holes: These allow steam to escape and help keep the crackers flat.
-
Watch the oven carefully: Cheese crackers can brown quickly during the final minutes.
-
Cool completely: The crackers become crispier as they reach room temperature.
Common Mistakes to Avoid
One common mistake is adding too much water. Excess moisture can make the dough sticky and produce crackers that are less crisp. Add water gradually until the dough just holds together.
Another mistake is rolling the dough too thick. Thick crackers may brown on the outside before drying sufficiently in the center. Aim for approximately 2–3 millimeters for a crisp result.
Using too much salt can also overpower the cheese flavor. Because Parmesan is naturally salty, taste and adjust the seasoning before baking.
Finally, avoid storing the crackers while they are still warm. Allowing them to cool completely helps maintain their crunchy texture.
Storage Instructions
Once the crackers have cooled completely, store them in an airtight container at room temperature for approximately 4–7 days, provided they remain dry and are handled with clean utensils.
If they lose some crispness, spread them on a baking tray and heat them in a 150°C (300°F) oven for 3–5 minutes. Let them cool again before serving.
You can also freeze the unbaked dough, tightly wrapped, for up to 2 months. Thaw it in the refrigerator before rolling and cutting.
Frequently Asked Questions
Can I make these crackers without Parmesan?
Yes. Replace the Parmesan with additional cheddar or another hard, flavorful cheese. The taste and saltiness will vary depending on the cheese you choose.
Can I make them spicy?
Absolutely. Add chili flakes, cayenne pepper, or a pinch of hot paprika to the dry ingredients.
Why are my crackers soft instead of crispy?
They may be too thick, slightly underbaked, or insufficiently cooled. Roll the dough thinner, bake until the edges are golden, and allow the crackers to cool completely.
Can I make the dough ahead of time?
Yes. Refrigerate the wrapped dough for up to 24 hours. Let it soften slightly if necessary before rolling. You can also freeze the dough for longer storage.
Can I use whole-wheat flour?
You can replace part of the all-purpose flour with whole-wheat flour. Start by substituting about one-quarter of the flour, since using too much can make the crackers denser and more crumbly.
Final Thoughts
These homemade cheesy Parmesan crackers are simple to prepare and packed with buttery, savory flavor. With a few everyday ingredients, careful dough preparation, and the right baking temperature, you can create golden crackers that are crisp, flavorful, and perfect for sharing.
The most important steps are keeping the butter cold, chilling the dough, rolling it evenly, and allowing the crackers to cool completely after baking.
Make a batch for your next gathering, afternoon tea, or movie night, and experiment with garlic, herbs, paprika, or chili to create your favorite version of this delicious homemade snack.

