
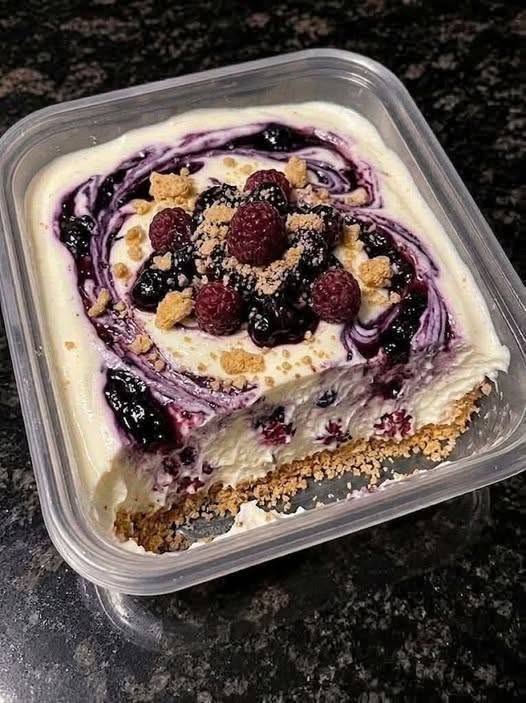
No-Bake Mixed Berry Cheesecake Dessert – Easy Creamy Berry Cheesecake Recipe
This No-Bake Mixed Berry Cheesecake Dessert is a delicious, creamy, and refreshing treat that is perfect for summer gatherings, family parties, birthdays, and special occasions. It features a buttery graham cracker crust, a smooth and fluffy cheesecake filling, beautiful swirls of rich berry sauce, and a generous topping of fresh raspberries, blackberries, and blueberries.
The best part about this dessert is that you do not need an oven. Everything comes together with simple ingredients and a little preparation. The creamy cheesecake layer balances perfectly with the sweet and slightly tangy berry topping, while the crunchy biscuit crust adds a wonderful texture to every bite.
You can prepare this dessert in a square container, glass dish, or individual dessert cups. It is also a great make-ahead recipe because chilling allows the cheesecake to become firm, flavorful, and easy to serve.
Preparation Time and Serving
Preparation Time: 25 minutes
Cooking Time: 5–10 minutes for the berry sauce
Chilling Time: 5–6 hours or overnight
Total Time: Approximately 6 hours
Servings: 8–10
Difficulty: Easy
Ingredients for the Biscuit Crust
2 cups graham cracker crumbs or digestive biscuit crumbs
6 tablespoons unsalted butter, melted
2 tablespoons granulated sugar
Ingredients for the Creamy Cheesecake Filling
16 ounces cream cheese, softened
1 cup heavy whipping cream, cold
¾ cup powdered sugar
1 teaspoon vanilla extract
1 tablespoon fresh lemon juice
½ cup sour cream
Ingredients for the Mixed Berry Sauce
1 cup fresh or frozen blueberries
½ cup raspberries
½ cup blackberries
¼ cup granulated sugar
1 tablespoon lemon juice
1 teaspoon cornstarch
1 tablespoon water
Ingredients for Decoration
¼ cup fresh raspberries
¼ cup fresh blackberries
¼ cup fresh blueberries
2 tablespoons crushed graham crackers
A few small biscuit pieces
Step 1: Prepare the Biscuit Crust
Start by preparing the crunchy biscuit base. Add the graham cracker crumbs or crushed digestive biscuits to a medium-sized mixing bowl.
If you are using whole biscuits, place them inside a food processor and blend until they become fine crumbs. You can also put them in a sealed plastic bag and crush them using a rolling pin.
Add the melted butter and granulated sugar to the crumbs. Mix everything until the texture resembles wet sand. The butter should coat the crumbs evenly so that the crust holds together when pressed.
Transfer the mixture into a square serving container or baking dish. Spread it evenly across the bottom using the back of a spoon or the bottom of a glass.
Press firmly to create a compact and even crust. Place the container in the refrigerator for at least 20–30 minutes while preparing the remaining ingredients.
Step 2: Make the Mixed Berry Sauce
Now prepare the beautiful berry sauce that gives this cheesecake its colorful appearance and fruity flavor.
Take a small saucepan and add the blueberries, raspberries, blackberries, granulated sugar, and lemon juice.
Place the saucepan over medium heat. Stir gently as the berries begin to soften and release their natural juices.
Allow the mixture to simmer for approximately 5–7 minutes. Some berries will break down completely, while others may remain slightly whole.
In a separate small bowl, combine the cornstarch with one tablespoon of water. Stir until smooth, then pour it into the berry mixture.
Continue cooking for another 1–2 minutes until the sauce becomes slightly thickened.
Remove the saucepan from the heat and allow the berry sauce to cool completely. It should have a thick but spoonable consistency.
Do not add hot berry sauce directly to the cheesecake filling because it can melt the cream and affect the texture.
Step 3: Prepare the Creamy Cheesecake Filling
Take a large mixing bowl and add the softened cream cheese.
Using an electric hand mixer, beat the cream cheese for approximately 2 minutes until it becomes smooth, creamy, and free of lumps.
Add the powdered sugar, vanilla extract, lemon juice, and sour cream. Continue mixing until all the ingredients are fully combined.
Scrape the sides of the bowl with a spatula to make sure everything is evenly incorporated.
The cream cheese mixture should be thick, smooth, and slightly fluffy. Avoid overmixing because too much mixing can affect the final texture.
Step 4: Whip the Heavy Cream
Pour the cold heavy whipping cream into a separate clean mixing bowl.
Using an electric mixer, beat the cream on medium-high speed until stiff peaks form. This usually takes around 3–5 minutes, depending on the mixer.
To check whether the cream is ready, lift the mixer attachments. The whipped cream should hold its shape without immediately falling back into the bowl.
Be careful not to overwhip the cream because it can become grainy and eventually turn into butter.
Step 5: Combine the Cheesecake Mixture
Add the whipped cream to the prepared cream cheese mixture in two or three portions.
Using a silicone spatula, gently fold the whipped cream into the cream cheese mixture.
Use slow movements from the bottom of the bowl toward the top. This helps preserve the air inside the whipped cream and creates a light, fluffy cheesecake texture.
Continue folding until the mixture becomes smooth and evenly combined.
Your cheesecake filling is now ready. It should be creamy, airy, and thick enough to spread over the biscuit crust.
Step 6: Assemble the Cheesecake Layers
Remove the chilled biscuit crust from the refrigerator.
Spoon the cheesecake filling over the crust. Spread it carefully using a spatula, making sure the entire surface is covered evenly.
Smooth the top so that it looks neat and attractive.
Reserve approximately two tablespoons of the berry sauce for decoration.
Drop small spoonfuls of the cooled berry sauce across the cheesecake layer. Use a toothpick or the tip of a butter knife to gently swirl the sauce into the creamy filling.
Create circular patterns or beautiful marble-like designs. Avoid mixing too much because you want to maintain visible purple and white swirls.
This step gives the dessert its attractive homemade cheesecake appearance.
Step 7: Add the Fresh Berry Topping
Now comes the most enjoyable part of the recipe.
Arrange fresh raspberries, blueberries, and blackberries in the center of the cheesecake.
You can place the berries in a small pile or distribute them evenly across the surface.
Add a few small pieces of crushed biscuits and sprinkle some graham cracker crumbs around the berries.
For extra color and flavor, add a little of the reserved berry sauce around the fresh fruit.
The combination of white cheesecake, deep purple berry swirls, and colorful fresh fruit creates a beautiful dessert that looks impressive without requiring complicated decorating techniques.
Step 8: Refrigerate Until Firm
Cover the container carefully with a lid or plastic wrap.
Place it in the refrigerator for at least 5–6 hours. For the best results, allow it to chill overnight.
During this time, the cheesecake filling becomes firmer, the flavors blend together, and the biscuit crust develops a better texture.
If you try to serve it too early, the filling may be too soft. Proper chilling is important for achieving a thick and creamy consistency.
Step 9: Serve and Enjoy
Once the cheesecake has chilled completely, remove it from the refrigerator.
Use a large spoon or dessert spatula to scoop out individual portions.
Make sure each serving includes some buttery biscuit crust, creamy cheesecake filling, berry sauce, and fresh fruit.
Serve cold for the best flavor and texture.
This dessert is especially delicious with a cup of coffee, tea, or a refreshing summer drink.
Tips for Making the Perfect Berry Cheesecake
Use softened cream cheese: Always allow cream cheese to reach room temperature before mixing. This prevents lumps and creates a smoother filling.
Keep the whipping cream cold: Cold cream whips more easily and holds its shape better.
Cool the berry sauce: Always allow the berry mixture to cool before adding it to the cheesecake.
Do not skip refrigeration: Chilling helps the cheesecake develop a thicker consistency and improves the overall flavor.
Choose fresh berries: Fresh berries make the topping colorful and refreshing. Frozen berries can also be used for the sauce.
Make it ahead: This recipe is perfect for preparing one day before a party or family gathering.
How to Store Mixed Berry Cheesecake
Store the cheesecake in an airtight container in the refrigerator for up to 3 days. Keep it covered to prevent it from absorbing odors from other foods.
For the freshest appearance, add the fresh berry decoration shortly before serving.
You can also freeze individual portions in freezer-safe containers for up to one month. Thaw them overnight in the refrigerator before enjoying. The texture may become slightly softer after freezing and thawing.
Frequently Asked Questions
Can I make this cheesecake without an oven?
Yes. This is a completely no-bake cheesecake recipe. The refrigerator does all the work of setting the filling.
Can I use frozen berries?
Absolutely. Frozen blueberries, raspberries, and blackberries work perfectly for making the berry sauce. You do not need to thaw them first.
Can I use strawberries instead?
Yes. Strawberries are an excellent addition. You can replace some of the other berries with chopped strawberries or use them for decoration.
Why is my cheesecake filling too soft?
The filling may be too soft if the whipping cream was not whipped properly, the cream cheese mixture was too warm, or the cheesecake did not chill long enough. Make sure to use heavy whipping cream and refrigerate the dessert for several hours.
Can I prepare this dessert the night before?
Yes. Preparing it overnight is actually recommended because it gives the cheesecake enough time to become firm and allows the flavors to develop.
Final Thoughts
This No-Bake Mixed Berry Cheesecake Dessert is a wonderful combination of creamy, fruity, sweet, and crunchy textures. The buttery biscuit crust provides the perfect foundation, while the smooth cheesecake filling and homemade berry sauce create an irresistible flavor combination.
Whether you are preparing a weekend family dessert, celebrating a birthday, hosting guests, or simply craving something sweet, this easy berry cheesecake is a fantastic choice.
With simple ingredients, easy preparation steps, and no oven required, you can create a beautiful homemade dessert that everyone will love. Make it ahead, chill it overnight, and enjoy every creamy, fruity bite!

