
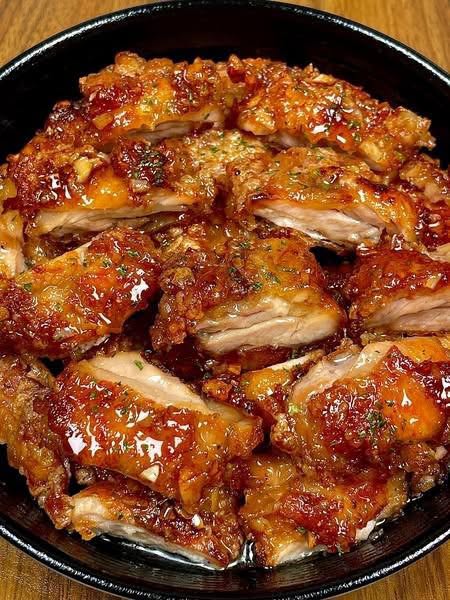
Sticky Honey Garlic Chicken Thighs Recipe: Step-by-Step Guide
Sticky honey garlic chicken thighs are a delicious, flavorful, and satisfying meal that combines juicy chicken with a glossy, caramelized sauce. The chicken shown in the picture has beautifully browned edges, a rich golden-brown coating, and a shiny glaze that clings to every piece. Fresh herbs add a little color, while the caramelized sauce creates the irresistible appearance that makes this dish perfect for a family dinner, weekend meal, or special gathering.
This recipe is easy to prepare and uses simple ingredients. The secret to getting chicken with a beautifully caramelized exterior is to brown the pieces properly before adding the sauce. The sauce is then cooked until thick, glossy, and sticky, allowing it to coat the chicken completely. The result is tender chicken with crispy browned edges and a sweet, savory, garlicky flavor in every bite.
Ingredients
For this recipe, use approximately 1½ to 2 pounds of boneless or bone-in chicken thighs. Chicken thighs are especially suitable because they remain juicy during cooking and have enough natural fat to develop excellent flavor.
You will need 1 teaspoon salt, ½ teaspoon black pepper, 1 teaspoon paprika, ½ teaspoon garlic powder, and 1 tablespoon cooking oil for seasoning and browning the chicken.
For the sticky sauce, prepare ⅓ cup honey, ¼ cup soy sauce, 4 to 5 cloves of finely minced garlic, 1 tablespoon rice vinegar or lemon juice, 1 tablespoon butter, ½ teaspoon grated ginger, and ½ teaspoon red pepper flakes if you enjoy a little heat.
For finishing, use chopped fresh parsley or coriander and a small amount of sesame seeds if desired.
Step 1: Prepare the Chicken
Start by preparing the chicken thighs. If using bone-in chicken, check the pieces for any excess skin or loose pieces of fat and trim them if necessary.
Pat the chicken dry with paper towels. This is an important step because removing excess moisture helps the chicken brown properly. Wet chicken tends to steam rather than develop a beautifully caramelized surface.
Place the chicken in a large bowl and season it with salt, black pepper, paprika, and garlic powder. Rub the seasonings thoroughly over every piece.
Allow the chicken to rest for approximately 10 to 15 minutes while you prepare the remaining ingredients.
Step 2: Prepare the Garlic Sauce
In a small bowl, combine the honey, soy sauce, minced garlic, rice vinegar or lemon juice, and grated ginger.
Add red pepper flakes if you want the sauce to have a spicy kick. Mix everything together until the honey is evenly incorporated.
The combination of honey and soy sauce creates the sweet and savory foundation of the glaze. Garlic adds a strong aromatic flavor, while vinegar or lemon juice provides acidity that prevents the sauce from becoming overly sweet.
Keep the sauce ready beside the stove.
Step 3: Heat the Pan
Place a large heavy skillet or frying pan over medium heat.
Add the cooking oil and allow it to heat for a minute or two. You want the pan hot enough to create a strong sear but not so hot that the chicken burns immediately.
A heavy-bottomed skillet works particularly well because it distributes heat evenly and helps produce a consistent golden-brown crust.
Step 4: Brown the Chicken
Place the chicken thighs into the hot pan in a single layer. Avoid overcrowding the pan because too many pieces at once can cause the temperature to drop.
Cook the chicken for several minutes on the first side without moving it too much. Allowing it to remain undisturbed helps create a beautiful golden-brown crust.
Once the first side is deeply browned, turn the chicken pieces over and brown the other side.
The chicken does not necessarily need to be completely cooked at this stage. The goal is to develop color and flavor before finishing the chicken in the sauce.
Step 5: Remove Excess Oil
If there is a large amount of oil or rendered chicken fat in the pan, carefully remove some of it.
Leave enough fat to continue cooking the chicken and sauce, but avoid having the chicken swimming in oil.
The browned bits stuck to the bottom of the pan are valuable because they contain concentrated flavor. They will combine with the sauce and create a much richer final dish.
Step 6: Add the Sauce
Reduce the heat to medium-low.
Pour the prepared honey garlic sauce over and around the chicken. You should immediately see the sauce begin to bubble gently.
Use a wooden spoon or spatula to loosen the browned bits from the bottom of the pan. These caramelized pieces will dissolve into the sauce and add wonderful flavor.
Turn the chicken pieces several times so that the sauce coats both sides.
Step 7: Cook Until the Chicken Is Tender
Cover the pan loosely with a lid and allow the chicken to cook over medium-low heat.
Cooking time depends on the size and type of chicken thighs. Boneless thighs usually cook faster, while bone-in pieces require more time.
Turn the chicken occasionally so the sauce coats every surface.
For food safety, chicken should reach an internal temperature of 165°F or 74°C in the thickest part.
Using a kitchen thermometer is the most reliable way to determine whether the chicken is fully cooked.
Step 8: Thicken the Sticky Glaze
Once the chicken is cooked through, remove the lid.
Increase the heat slightly and allow the sauce to simmer uncovered.
As the liquid evaporates, the honey will become thicker and more concentrated. Continue cooking until the sauce becomes glossy and sticky and clings tightly to the chicken.
Keep stirring or turning the chicken frequently during this stage because honey can burn if left against a very hot pan for too long.
The chicken should develop the shiny, caramelized appearance visible in the picture.
Step 9: Add Butter
Once the sauce has thickened, add the butter.
Allow it to melt into the glaze while gently turning the chicken pieces.
Butter gives the sauce a smooth, glossy finish and adds richness. It also helps the glaze cling beautifully to the chicken.
At this point, taste a little of the sauce. If you want more sweetness, add a small amount of honey. If you prefer more acidity, add a few drops of lemon juice. For additional spice, add another pinch of red pepper flakes.
Step 10: Caramelize the Chicken
Continue cooking the chicken uncovered for another minute or two, turning the pieces carefully.
The goal is to allow the glaze to caramelize lightly around the edges without burning.
The finished chicken should have a deep golden-brown to reddish-brown appearance, with sticky sauce coating the surface.
Do not walk away during this stage because the sauce can change from perfectly caramelized to burnt very quickly.
Step 11: Rest the Chicken
Turn off the heat and allow the chicken to rest in the pan for approximately 5 minutes.
Resting gives the juices time to redistribute throughout the meat. It also allows the sticky sauce to settle and become even thicker.
Avoid cutting the chicken immediately after cooking because this can cause flavorful juices to escape.
Step 12: Garnish and Serve
Transfer the chicken to a large serving plate or bowl.
Spoon any remaining sticky sauce from the pan over the top. Finish with chopped fresh parsley or coriander.
You can also sprinkle sesame seeds over the chicken for extra texture and a beautiful presentation.
Serve the chicken while hot.
What to Serve With Sticky Honey Garlic Chicken
This chicken pairs beautifully with steamed white rice because the rice absorbs the sweet and savory sauce. You can also serve it with fried rice, mashed potatoes, roasted potatoes, noodles, or steamed vegetables.
For a lighter meal, serve the chicken alongside a fresh cucumber salad, green beans, broccoli, carrots, or mixed vegetables.
The sticky sauce is flavorful enough to make simple side dishes taste special.
Tips for Perfect Sticky Chicken
Always pat the chicken dry before seasoning. This helps the surface brown rather than steam.
Do not overcrowd the pan. If necessary, brown the chicken in batches.
Keep the heat moderate when cooking the honey glaze. Honey contains natural sugars that can burn quickly.
For the best flavor, use freshly minced garlic rather than pre-minced garlic from a jar.
If you want extra crispy chicken, you can lightly dust the chicken with a small amount of cornstarch before browning. This creates a slightly crisp exterior that holds onto the glaze beautifully.
For a spicier version, add chili flakes, cayenne pepper, or a little hot sauce.
For a stronger Asian-inspired flavor, add a teaspoon of sesame oil and a little grated fresh ginger to the sauce.
How to Store Leftovers
Allow leftover chicken to cool before placing it in an airtight container. Refrigerate it and consume it within a few days.
When reheating, use a skillet over low to medium heat. Add a small splash of water and cover the pan briefly to prevent the chicken from drying out.
You can also reheat it in the microwave, although the chicken will generally retain better texture when reheated gently in a pan.
Final Thoughts
Sticky honey garlic chicken thighs are an easy and delicious recipe that turns simple chicken into a restaurant-style meal. The combination of deeply browned chicken, fragrant garlic, sweet honey, savory soy sauce, and a touch of acidity creates a balanced glaze that is rich without being overly complicated.
The most important steps are drying and seasoning the chicken, giving it enough time to brown, cooking it thoroughly, and reducing the sauce until it becomes glossy and sticky. Once finished, the chicken should be juicy inside, beautifully caramelized outside, and coated with a rich glaze.
Serve these golden sticky chicken pieces with rice, vegetables, potatoes, or noodles for a complete meal. With its attractive presentation and bold sweet-and-savory flavor, this recipe is sure to become a favorite for both family dinners and special occasions.

