
Creamy Custard Squares with Flaky Puff Pastry: Step by Step Recipe
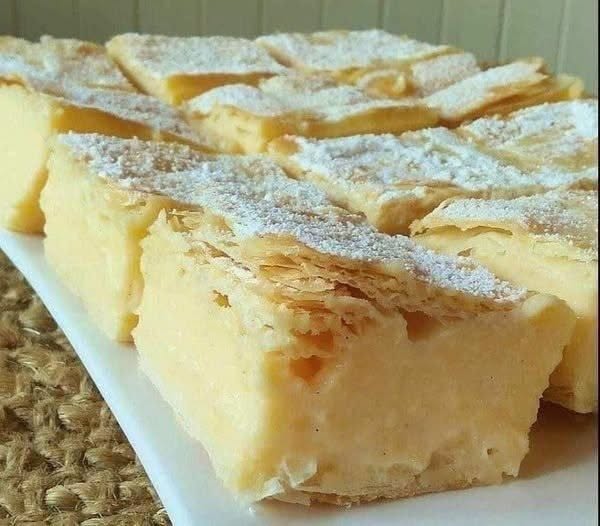
Creamy custard squares with flaky pastry are a classic homemade dessert that combines a crisp, buttery pastry layer with a rich, smooth vanilla custard filling. The dessert shown in the picture has a beautiful golden pastry top, a thick pale yellow custard center, and a delicate dusting of powdered sugar. Every bite offers a wonderful contrast between crisp pastry and soft, creamy custard, making these squares perfect for afternoon tea, family gatherings, holidays, celebrations, or simply when you want an impressive dessert without complicated decoration.
This recipe is sometimes described as custard slices, vanilla custard squares, cream pastry squares, or a simple homemade mille-feuille style dessert. The method is straightforward, but a few details are important for getting a firm custard and crisp pastry. The key is to cook the custard slowly, cool it properly, and allow the assembled dessert enough time to chill before cutting.
Ingredients
For the pastry layers, you will need two sheets of ready-made puff pastry. You can use homemade puff pastry if you prefer, but refrigerated or frozen puff pastry makes this recipe much easier. You will also need a little flour for rolling, one egg for brushing the pastry if desired, and powdered sugar for decorating.
For the custard filling, prepare 4 cups of whole milk, ¾ cup granulated sugar, ½ cup cornstarch, 4 egg yolks, 2 tablespoons all-purpose flour, 2 teaspoons vanilla extract, and 2 tablespoons butter. You can add a small pinch of salt to balance the sweetness.
The quantities make approximately 12 medium-sized custard squares, depending on the size of your baking dish and how large you cut the pieces.
Step 1: Prepare the Puff Pastry
Begin by preheating your oven to 400°F or approximately 200°C. If you are using frozen puff pastry, allow it to thaw according to the package instructions while keeping it cool.
Place the first sheet of puff pastry on a lightly floured work surface. Gently roll it if necessary so that it fits the size of your baking pan. Do not roll it excessively because you want the pastry to retain its flaky layers.
Transfer the pastry to a baking tray lined with parchment paper. Prick the entire surface several times with a fork. This prevents the pastry from puffing excessively during baking and helps create a relatively flat layer.
Step 2: Bake the First Pastry Layer
Place the pastry in the preheated oven and bake for approximately 15 to 20 minutes, or until it becomes golden brown and crisp.
Keep an eye on it during the final few minutes because puff pastry can brown quickly. Once golden, remove it from the oven and place it on a wire rack to cool.
The pastry should be completely cool before you assemble the dessert. Warm pastry can soften the custard and make the final dessert difficult to cut.
Step 3: Bake the Second Pastry Layer
Repeat the same process with the second sheet of puff pastry.
Place it on a lined baking tray, prick it with a fork, and bake until golden and crisp. This second piece will become the top layer of the dessert.
For the appearance shown in the picture, you can gently press the baked pastry after it comes out of the oven if it has puffed too much. Do this carefully while it is still warm, using another baking tray or a flat spatula.
Allow the second pastry layer to cool completely.
Step 4: Prepare the Custard Mixture
While the pastry is cooling, begin preparing the custard.
Pour approximately 3 cups of milk into a saucepan and place it over medium heat. Do not bring it to a vigorous boil. You want the milk to become hot and steamy.
In a separate bowl, combine the remaining 1 cup of milk with the cornstarch, flour, sugar, and egg yolks. Whisk thoroughly until the mixture is completely smooth.
Make sure there are no visible lumps of cornstarch or flour. A smooth mixture at this stage will help you achieve a silky custard.
Step 5: Combine the Milk and Egg Mixture
Slowly pour the hot milk into the egg and cornstarch mixture while whisking continuously.
Adding the hot milk gradually is important because it gently raises the temperature of the eggs. If you pour very hot milk into the eggs all at once, they can cook too quickly and form unwanted pieces.
Once everything is combined, pour the mixture back into the saucepan.
Step 6: Cook the Custard
Place the saucepan over medium-low heat and begin stirring continuously with a whisk or wooden spoon.
As the mixture heats, the cornstarch will begin thickening the custard. Continue stirring until it becomes thick and creamy.
This usually takes several minutes. Do not leave the saucepan unattended because custard can stick to the bottom or develop lumps quickly.
The finished custard should be thick enough to hold its shape. When you lift the whisk, the custard should fall slowly rather than behaving like ordinary milk.
Step 7: Add Vanilla and Butter
Once the custard has thickened, remove the saucepan from the heat.
Immediately add the vanilla extract and butter. Stir until the butter has completely melted and the mixture becomes smooth and glossy.
Taste the custard carefully after it cools slightly. If you prefer a stronger vanilla flavor, you can add a little additional vanilla extract.
The butter gives the filling a richer texture, while vanilla provides the classic flavor associated with custard squares.
Step 8: Cool the Custard Slightly
Transfer the hot custard to a clean bowl.
Place a piece of plastic wrap directly against the surface of the custard. This helps prevent a thick skin from forming while it cools.
Allow the custard to cool until it is warm rather than hot. Do not allow it to become completely cold and stiff before assembly because it will be more difficult to spread evenly.
Step 9: Assemble the Dessert
Place the first baked puff pastry layer into a rectangular baking dish or suitable serving tray.
Pour the prepared custard over the pastry.
Use a spatula to spread the custard evenly from one corner to the other. Try to create a level layer with approximately the same thickness throughout.
The custard layer should be generous because it is the main feature of the dessert.
Step 10: Add the Top Pastry
Carefully place the second pastry sheet on top of the custard.
If the pastry has broken into pieces, do not worry. You can gently arrange the pieces across the surface. Once the dessert is cut into squares, it will still look attractive.
For easier serving, some people prefer to cut the top pastry into squares before placing it on the custard. This can make it much easier to cut the finished dessert without pressing down and squeezing out the creamy filling.
Step 11: Chill the Custard Squares
Cover the baking dish and place it in the refrigerator.
Allow the dessert to chill for at least 4 to 6 hours. For the best results, refrigerate it overnight.
This step is extremely important. The custard needs enough time to become firm, allowing the layers to hold together when sliced.
Do not rush the chilling process. A properly chilled dessert will produce much cleaner and more attractive squares.
Step 12: Cut into Squares
Once completely chilled, remove the dessert from the refrigerator.
Use a sharp knife to cut it into squares or rectangles.
For cleaner cuts, dip the knife into hot water, wipe it dry, and then slice. Repeat this process between cuts.
Cut gently rather than pressing down too hard. This helps preserve the delicate puff pastry and prevents too much custard from being pushed out.
Step 13: Add Powdered Sugar
Place the custard squares on a serving plate.
Use a fine sieve to dust the tops generously with powdered sugar. The powdered sugar adds sweetness and creates the beautiful appearance shown in the picture.
For a festive presentation, you can also add a tiny amount of cinnamon or grated chocolate, although traditional custard squares are delicious with nothing more than powdered sugar.
Tips for Perfect Custard Squares
The quality of the puff pastry makes a big difference. Choose a good-quality pastry that contains enough butter to create crisp, flaky layers.
Always allow the pastry to cool before adding the custard. If the pastry is hot, it can cause the filling to soften and make the dessert unstable.
When cooking the custard, keep stirring continuously. This prevents lumps and stops the mixture from sticking to the bottom of the pan.
If your custard develops a few small lumps, pass it through a fine-mesh sieve while it is still warm. This can help restore a smooth texture.
Do not reduce the cornstarch too much because it is responsible for giving the custard enough structure to remain between the pastry layers.
For an especially rich filling, you can replace part of the milk with heavy cream. This creates a more luxurious custard, although whole milk produces an excellent result on its own.
How to Store the Dessert
Keep the finished custard squares covered and refrigerated. They are best enjoyed within two to three days because the pastry gradually absorbs moisture from the custard.
If you are preparing them for guests, make the dessert the day before and add the powdered sugar shortly before serving. This keeps the sugar looking fresh and attractive.
Final Thoughts
These creamy custard squares are a wonderful combination of crisp puff pastry and smooth homemade vanilla custard. The golden flaky layers provide a delicate crunch, while the thick custard creates a soft, rich center. A simple coating of powdered sugar completes the dessert and gives it the elegant appearance seen in the picture.
The recipe is easy enough for a beginner but impressive enough for a special occasion. The most important steps are baking the pastry until crisp, preparing a smooth and thick custard, assembling the layers carefully, and allowing plenty of refrigeration time before slicing. Once chilled and cut into neat squares, these homemade custard pastries make a beautiful dessert that is sure to disappear quickly from the serving plate.

