
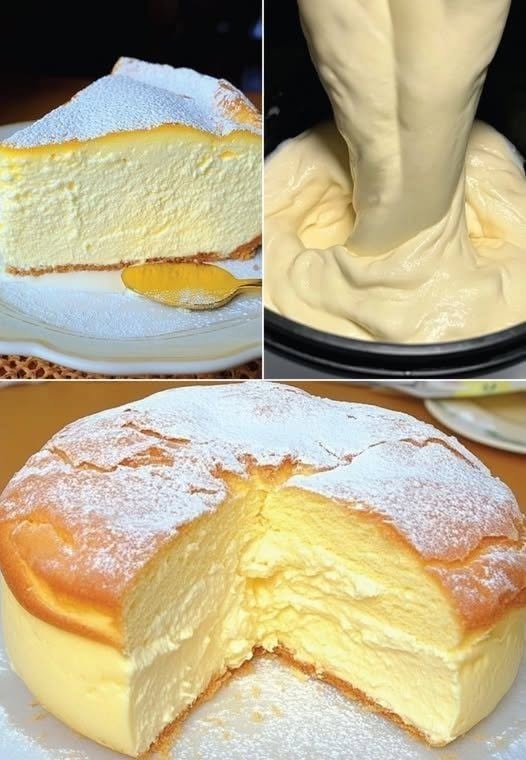
Japanese cotton cheesecake is a wonderfully light dessert that combines the rich creaminess of traditional cheesecake with the soft, airy texture of a soufflé. As shown in the image, this cake has a beautiful golden top, a delicate crust, and a smooth, creamy center that almost melts in your mouth. A light dusting of powdered sugar gives it a simple yet elegant finish.
Unlike dense New York-style cheesecake, Japanese cotton cheesecake is made with whipped egg whites folded into a cream cheese batter. This creates its signature fluffy texture and gentle jiggle. Although the cake looks impressive, you can make it at home using simple ingredients and a little patience.
This step-by-step recipe explains how to prepare the batter, achieve a smooth texture, bake the cake gently, and prevent common problems such as cracking or collapsing.
Table of Contents
ToggleRecipe Overview
Preparation time
25–30 minutes
Baking time
60–75 minutes
Cooling time
1–2 hours or longer
Servings
8 slices
Ingredients for Japanese Cotton Cheesecake
These quantities are suitable for one 7-inch (18 cm) round cake pan.
-
250 g cream cheese, softened
-
50 g unsalted butter
-
100 ml whole milk
-
6 large eggs, separated into yolks and whites
-
60 g cake flour
-
20 g cornstarch
-
120 g granulated sugar, divided
-
1 teaspoon vanilla extract
-
1 tablespoon lemon juice
-
1 teaspoon finely grated lemon zest, optional
-
A small pinch of salt
For decoration
-
Powdered sugar, for dusting
-
Fresh strawberries or other berries, optional
-
Whipped cream, optional
Important: Measure the ingredients accurately. Japanese cotton cheesecake depends on the balance between the cream cheese mixture and the whipped egg whites. Too much flour or sugar can affect its delicate texture.
Step-by-Step Instructions
Step 1: Prepare the cake pan
Start by preparing a 7-inch round cake pan. Line the bottom with baking parchment and line the sides with parchment paper as well. Allow the paper around the sides to extend slightly above the rim if your pan is shallow.
Lightly grease the pan so the parchment stays in place.
Because this cheesecake is baked in a water bath, wrap the outside of the pan with two or three layers of heavy-duty aluminum foil if you are using a removable-bottom pan. This helps prevent water from entering the cake.
Set the prepared pan aside while you make the batter.
Step 2: Preheat the oven
Preheat your oven to 150°C (300°F).
Place an oven rack in the lower-middle position. Japanese cotton cheesecake needs gentle, even heat to rise properly without becoming too dark on top.
Prepare a larger baking tray that can hold the cake pan. You will add hot water to this tray later to create a water bath.
Avoid using very high heat. Baking the cake too quickly can cause a cracked surface, an overly browned top, or a center that remains undercooked.
Step 3: Melt the cream cheese, butter, and milk
Cut the softened cream cheese and butter into small pieces and place them in a heatproof bowl with the milk.
Set the bowl over a saucepan containing gently simmering water. Make sure the bottom of the bowl does not touch the water.
Stir slowly until the ingredients melt together and form a smooth, creamy mixture. Remove the bowl from the heat.
Let the mixture cool slightly before adding the egg yolks. If the mixture is too hot, it may cook the eggs prematurely and create lumps.
For the smoothest result, use full-fat cream cheese and avoid cream cheese that is still cold and firm.
Step 4: Add the egg yolks and flavorings
Add the six egg yolks to the slightly cooled cream cheese mixture, one at a time, whisking after each addition.
Next, add the vanilla extract, lemon juice, and optional lemon zest. Mix until everything is well combined.
The lemon adds a subtle freshness that balances the richness of the cream cheese without making the cheesecake taste strongly of lemon.
Your mixture should look pale yellow, silky, and smooth.
Step 5: Sift in the dry ingredients
In a separate bowl, combine the cake flour, cornstarch, and salt.
Sift the mixture into the cream cheese batter in two or three additions. Whisk gently until no dry flour remains.
Avoid vigorous mixing once the flour is added. Excessive mixing can develop gluten and make the finished cheesecake less delicate.
If you notice lumps, pass the batter through a fine-mesh sieve. This simple step helps create the smooth interior shown in the recipe image.
Set the batter aside while you prepare the egg whites.
Step 6: Whip the egg whites
Place the six egg whites in a completely clean, dry mixing bowl. Even a small amount of egg yolk or grease can prevent them from whipping properly.
Using an electric mixer, beat the whites on medium speed until they become foamy.
Gradually add the remaining granulated sugar, a little at a time, while continuing to beat.
Increase the speed slightly and whip until the egg whites form medium-soft peaks. When you lift the beaters, the peaks should hold their shape but curl gently at the tips.
Do not beat the whites until they are extremely stiff or dry. Overwhipped egg whites are difficult to fold into the batter and can leave large air pockets in the cake.
This step is essential because the whipped whites provide the cake’s light, soufflé-like structure.
Step 7: Fold the egg whites into the batter
Add approximately one-third of the whipped egg whites to the cream cheese mixture. Stir gently to loosen the batter.
Add the remaining egg whites in two additions. Use a spatula to cut down through the center, sweep along the bottom of the bowl, and fold the mixture over itself.
Rotate the bowl as you work.
Continue folding just until the batter is evenly colored and no large streaks of egg white remain. Try to preserve as much air as possible.
The finished batter should be light, smooth, and airy rather than thin and watery.
Step 8: Pour the batter into the pan
Pour the batter into the prepared cake pan.
Gently tap the pan against the counter once or twice to release any large air bubbles. Do not bang it forcefully, as this can deflate the batter.
Use a spatula to smooth the surface.
Place the cake pan inside the larger baking tray. Pour hot water into the outer tray until it reaches approximately 1–2 cm up the sides of the cake pan, or roughly one-quarter to one-third of its height.
Be careful not to splash water into the batter.
The water bath provides gentle, moist heat, helping the cheesecake cook evenly and reducing the risk of a dry texture.
Step 9: Bake the cheesecake slowly
Place the tray in the preheated oven and bake at 150°C (300°F) for approximately 60–75 minutes.
Baking times vary according to the oven, pan material, and batter depth. Avoid opening the oven frequently, especially during the first 45 minutes, because sudden temperature changes can cause the cake to sink.
Watch the surface as it bakes. It should become lightly golden, similar to the cake in the image.
The cake is ready when the top feels set, the sides are stable, and the center has a slight, gentle jiggle rather than looking liquid. If you use a thermometer, the center should be around 90–93°C (194–199°F) for a fully set, moist cheesecake.
If the top browns too quickly, loosely cover it with foil once the surface has set.
Step 10: Cool the cake gradually
When the cake is cooked, turn off the oven and leave the door slightly open for about 10–15 minutes.
This gradual cooling helps reduce sudden temperature changes that can make the cake collapse.
Remove the cake from the water bath and carefully remove the foil. Let it cool in its pan until it is no longer hot.
Run a thin knife around the edge if necessary, then carefully remove the cake from the pan.
A small amount of shrinking is normal. Japanese cotton cheesecake often settles slightly as it cools because the air inside the cake contracts.
Step 11: Chill and decorate
For a firmer, cleaner slice, refrigerate the completely cooled cheesecake for at least 2–3 hours. You can also serve it slightly warm for a softer, more soufflé-like texture.
Before serving, dust the top with powdered sugar using a fine sieve.
For a special occasion, add fresh strawberries, raspberries, or a small spoonful of whipped cream. Keep the decoration light so it does not overpower the cake’s delicate flavor.
Use a sharp knife to cut the cheesecake into slices. Wipe the knife clean between cuts for neater portions.
Step 12: Serve and enjoy
Serve each slice on a chilled or room-temperature dessert plate.
The ideal Japanese cotton cheesecake has a golden outer surface, a soft and delicate interior, and a gentle creamy flavor. Its texture should be lighter than conventional cheesecake while still tasting rich enough to feel like a special dessert.
Enjoy it with coffee, green tea, black tea, or a glass of cold milk.
Tips for the Best Fluffy Cheesecake
Medium-soft peaks provide enough structure without making the batter difficult to fold. Overwhipped whites may cause an uneven rise or large holes.
A water bath and moderate oven temperature help the cake bake evenly. Every oven behaves differently, so use the texture and doneness cues as well as the timer.
Gentle folding preserves the air that makes the cake rise. Stop as soon as the egg whites are evenly incorporated.
Common Problems and How to Fix Them
Why did my cheesecake collapse?
A slight reduction in height is normal. However, a large collapse may happen if the egg whites were poorly whipped, the center was underbaked, or the cake cooled too quickly. Check doneness before removing it from the oven and cool it gradually.
Why is the center wet or dense?
The cake may need more baking time, or the egg whites may have deflated during mixing. Make sure your oven temperature is accurate and fold the batter gently.
Why did the top crack?
Cracks can occur when the oven is too hot or the cake rises too quickly. Lower the temperature slightly if needed, use a water bath, and avoid sudden temperature changes.
Why does my cake have large holes?
Large air pockets can result from overwhipped egg whites or uneven folding. Whip to medium-soft peaks and gently remove large bubbles before baking.
Storage Instructions
Store the cheesecake in an airtight container in the refrigerator for up to 3 days for the best quality. Avoid leaving it at room temperature for more than 2 hours, or 1 hour in very hot conditions.
You can freeze individual slices in airtight wrapping for up to 1 month for best quality. Thaw them in the refrigerator before serving. The texture may change slightly after freezing and thawing.
Frequently Asked Questions
Can I make Japanese cotton cheesecake without cake flour?
Yes. All-purpose flour can work as a substitute, although the texture may be slightly less delicate. Measure carefully and avoid overmixing.
Can I use low-fat cream cheese?
Full-fat cream cheese generally gives the richest flavor and most reliable texture. Low-fat varieties may produce a softer or less creamy result.
Can I make the recipe without a water bath?
A water bath is strongly recommended because it provides gentle, moist heat. Without it, the cheesecake may brown more quickly or develop cracks.
Does Japanese cotton cheesecake need refrigeration?
Yes. Refrigerate it after cooling, particularly if you are not serving it immediately. Chilling also helps the cake hold its shape when sliced.
Conclusion
Japanese cotton cheesecake is a beautiful homemade dessert that combines the flavor of classic cheesecake with the airy softness of a soufflé. Although it requires a few careful techniques, the ingredients are simple, and the process becomes easier with practice.
The secrets to success are a smooth cream cheese mixture, properly whipped egg whites, gentle folding, slow baking, and gradual cooling. Follow these steps, and you can create a tall, golden cheesecake with a creamy center and a delicate texture that looks just as tempting as the cake in the image.
Whether you serve it for afternoon tea, a family gathering, or a weekend dessert, this fluffy Japanese cheesecake is a lovely treat that is worth making from scratch.

